FYI


Friday, December 3, 2010

A closer look

Hehe, I am getting into the teasing game. I keep including photos in the blog that have something in the background which I will come back to in a later post. So, wanna take a closer look at what I have in my frame above the kitchen mantle? Ah, go on. You know you want to. Go on, go on, go on, go on, go on, go on, go on, go on, go on...

 
The frame is familiar, I know. The previous years I have always displayed a few Christmas baubles, suspended from ribbon in the frame. This year, I felt, it was time for something different. And since I had picked up this branchy heart in an online sale somewhere, I just decided to make it a bit more Christmassy.


The vichy-check ribbon stayed on. I only wound some red stars and beads on silver wire around the heart.


Presto! Easy does the trick. I love the way the shadow of the glass stars shines all red onto the wall.


Best,

Thursday, December 2, 2010

A little update on my kitchen mantle

You may have noticed my kitchen mantle in my previous post. It was rather blurry in the background. So today I proudly present a clear look at what is happening on my mantlepiece. Well, it is quite similar to last year's arrangement - I love symmetry on display because it gives the illusion of order and space, something that I am usually not associated with *haha*.


Center stage takes our beautiful Peruvian nativity. We have a family connection with Peru and this is the reminder of that, coming out of storage for a a few weeks every year. This piece of folk art is at this stage 40 years old - and is still as shiny and colourful as it was when bought all those years ago. Well, apart from the design on the doors of the nativity. They have faded away over the years - this used to be on display all year 'round in front of my mother-in-law's fireplace. I love the way the nativity scene has been transferred to Peruvian country life...

Now, how do you like them apples? *hehe* They are not necessarily Christmas decorations, but their colour fits my scheme (and my politics *haha*). Never mind they were bought really cheaply from the discount tray in a small interior design shop in the North of Germany...

The hurricane lamps are a relatively recent addition. I had cracked one of my previous two hurricanes by lazily sticking it into the dishwasher - the hot water killed it instantly *RIP*. I found these as replacements - and I love the way they only let the candlelight shine through the small cracks. I've had lots of fun "drawing with light" i.e. photographing that the other day...

So, with the nights starting early (and the days getting darker, too - it is half three in the afternoon and I have to put on the lights in my study because the heavy snowfall outside darkens the sky so much...), I look forward to lighting my candles every night now during dinner...


Best,

Monday, November 29, 2010

First of Advent

The first of advent is through. I have slowly crept into the kitchen with my decorating efforts, but in comparison to previous years this year's decoration is much tamer. The reason is really that I am so busy - and also find it hard to get over my laziness when I do have a free second. Well, it's a process of little steps. And yesterdays steps included decorating the kitchen chandelier.


I was nearly too late to get the holly - we are snowed in. Snow in Ireland is very rare. Snow in  November is nearly unheard of. Luckily there is a park across the street from me, where I was able to nick a few branches.

This is the easiest deco ever - I just weave the branches around the chandelier and then hang the baubles. Nice effect. Only problem are the holly berries which tend to drop into our food when eating at the dining table underneath the chandelier ;-). Especially once the branches have been up a few day and are drying out. But hey, a few concessions need to be made for proper Christmas atmosphere...

Best,

Tuesday, November 23, 2010

Christmas 2010 begins

Finally, the day is here. Let the games fun begin: Today is the official opening of Christmas season 2010. At least in my books. According to tradition, Christmas decorating in Germany does not begin until after the last Sunday before Advent. The first of Advent, i.e. the first of the four Sundays before Christmas Day, is next weekend. I had been aching to get my Chrimbo decorations down from the attic, but had to wait until Mr Craft-Werk was ready to face my annual Christmas marathon. Truth is - I just love Christmas. Always have, always will. Even if others think it is phoney or overly commercialised these days. For me it is still the family celebration it was in my childhood. And I insist on giving my children the same experience of the magical time up until and on Christmas - even though I live in a country now that boasts little if any great Christmas traditions. No matter. Christmas is firmly German in our household.


Nonetheless, life is about those little compromises. And if Mr Craft-Werk doesn't care much for the occasion, I will at least not subject him to it full-on. So I started off quite lightly today and so far have only decorated a bit in the drawing room. My most coveted item of Christmas decorations is up first - the nativity - and gets centre-stage on the drawing room mantle.

While I was rooting for the nativity and stockings it occurred to me that it was a real shame that I would have to go through the boxes again once I am ready to decorate the tree shortly before Christmas. But then I thought, why not organise that now - and make the best of it by keeping my collection of baubles at hand and also display them.

Out they came out of their boxes. I simply filled them in a large glass bowl.

Some of the baubles are cheap red glass balls. The purple ones I picked up really cheaply this January in the sales. And the silver ones are antique. They came to me from my grandmother (who is now 92). According to family lore, they were bought when my grandmother was born in 1918.


So there is a bit of glamour in the drawing room now, but really just a handy way of storing the baubles in an easily accessible place until I dig them out to put on the tree.


With half the drawing room under my belt, I look forward to starting on the kitchen now. How far have you come??

Best,

Monday, November 8, 2010

Busy busy busy

Is it really a week since I last posted? Oh dear, here we go again - college taking up a lot of my time again. Does this count as a creative project? I have made a little search story, charting the last year in my Diploma in Photography course. Graduation coming up on Thursday. Time to look back - and celebrate.


Back soon - because miraculously being in college does NOT suck all my creativity into photography, but channels some into my private, crafty pursuits.

Best,

Sunday, October 31, 2010

Happy Halloween, then

Here is my token pumpkin - didn't even get 'round to carvin one, myself. This'll do - not mad for this occasion, anyway.


Off to various kiddie entertainment occasions now.

Happy Halloween, everyone!

Best,

Saturday, October 30, 2010

The Gumby School of Flower Arranging Strikes Again

Autumn. Darker days. A lot of rain (this is Ireland, after all). Windy season. Time to switch on the heater when I sit down at the computer at 6 am. Candle light. Soups. And lovely walks in between the showers (of rain - I don't take showers more than once a day. At least in autumn.) No wonder this season is called "fall" in American English - the falling leaves are the most descriptive characteristic. I love the colours of autumn/fall. And today I found a project to combine my degree from the Gumby School of Flower Arranging with my obsession for collecting leaves and stuff from the park.


Can you guess what I made (apart from a classic Gumby-style arrangement)? Well, I'm not sure whether you can guess it, but I made those roses from leaves. Oui, oui. I got really quite excited about this project (yeah, go on, amuse yourself by imagining this middle-aged wifey prancing around excitedly in her kitchen, brandishing leaves and twiddling with twine...). I had never seen this in craftblogland before. It actually came from a contact in an internet forum who provided me with a link to a German crafts website called Bastelelfe (sorry, no link available to tutorial). Right, a project that appealed to me - autumnal, involving a walk for gathering leaves, for free. Let me show you.

I started out with a heap of leaves from my park - plus assorted autumnal 
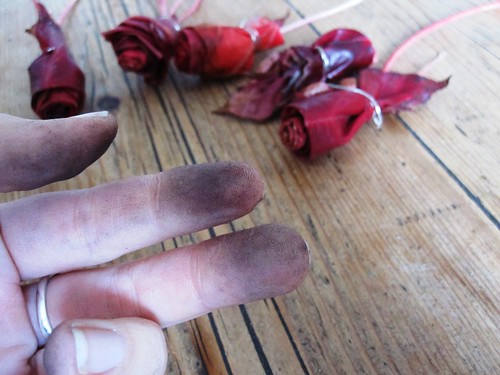
plant bits and bobs which I indiscriminately had chucked into my bag when gathering leaves. A little advice: When getting the leaves, do pick them from the tree and do not gather them from the ground. They are dirty little buggers, so to speak. I'll show you evidence later.

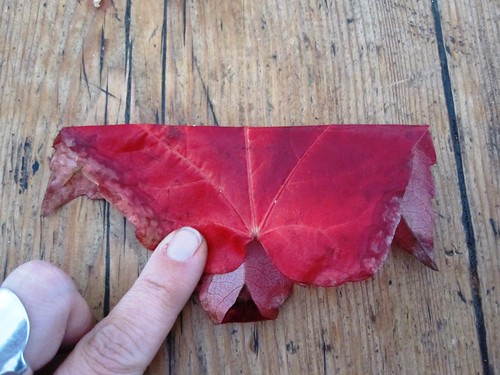
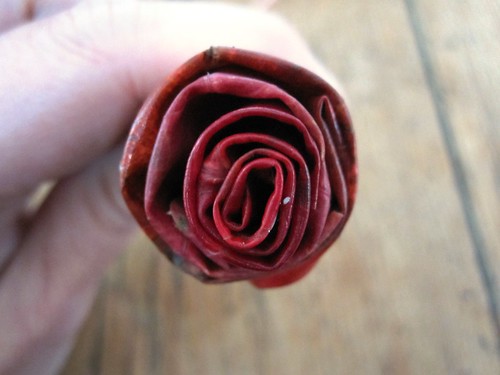
In order to make those roses, you need some red leaves. Mine are from a Virgina Creeper that grows on our terrace of houses. They are the most vivid shade of red, sometimes even pink. So, start off with one red leaf.

Fold the leaf in half, keeping the shiny side outside.

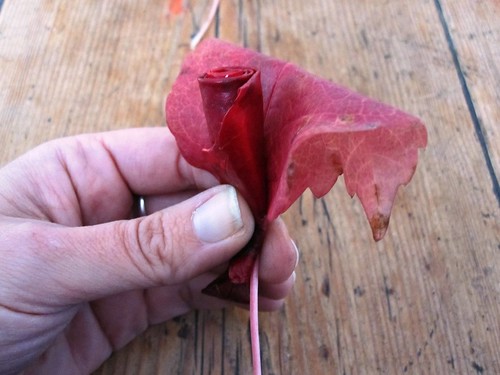
Roll up the leaf. It doesn't have to be particularly tight.

Now place another leaf behind your rolled one, fold the leaf backwards (shiny side out) and fold the two sides loosely around the rolled leaf.

Continue to do that until you have a "rose" in the desired size. Then secure the leaves with a bit of twine like so:

I made my roses fairly small (partly because I hadn't picked enough red leaves...) and this is what they look like:

After rolling about seven of those leaf roses, I realised it had been a bad idea to pick up the leaves from the ground. Look at my fingers:

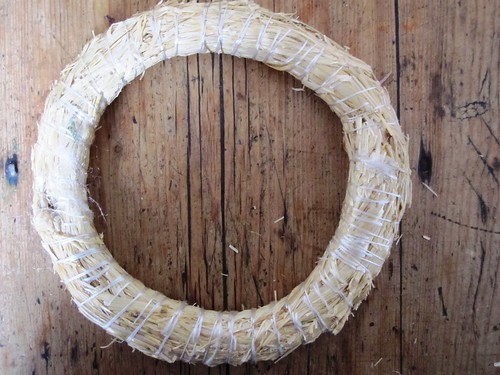
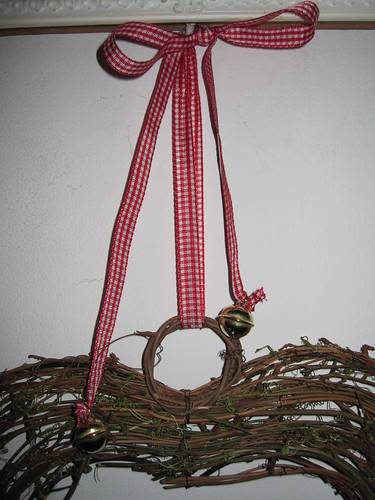
Now, you can either just arrange your leaf roses in a bouquet or you can make a wreath - that's what I did. I found a straw wreath base that gave a bit of volume to my meagre amount of materials *grins*.

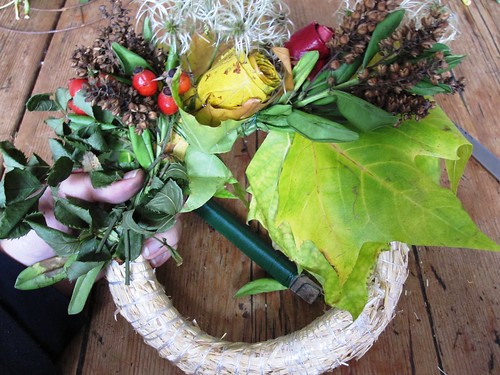
Taking leaves, roses and the other stuff in little bundles, I just placed them on the base and then secured them by wrapping florist's wire around them. I used leaves to hide the unsightly wreath base. Keep overlapping the bundles over the previous one, that way the wire is invisible.


And voila - you have a lovely autumnal wreath that can grace your door or wall or might also look nice on a table with a candle in the centre. True to Gumby style, my wreath is a bit lopsided. I like it that way!!! *ahem*.


Best,


Linking to:   The Weekend Wrap-Up @ It's So Very Cheri   ***  Get Your Craft On with Today's Creative Blog   ***   The Boardwalk Bragfest @ Bobbypin's Boardwalk   ***  Make it Yours Day @ My Backyard Eden   ***   Strut Your Stuff Thursday @ somewhat simple   ***   

Tuesday, October 26, 2010

Flower Power

Yeah, I am aware it is autumn and not spring. But a little flower enhances the dullest of seasons and the greyest of baskets, ey? Making them is the easiest of things. Do you want a tutorial? Ha! Resistance futile! You're gonna get one, anyway...


Easy as 1 - 2 - 3: Cut out some petal shapes. They don't need to be regular - mother nature is pretty irregular, too.

Stitch together.

Use different colour felt for a centre of the flower - I used some grey scraps from yesterday's felt basket to coordinate, just simply stitching it on with red thread.

Or make it even easier by using a button as the centre.


Yep, you've guessed it - I couldn't resist and made another felt basket. This time in brown, with felt left over from my retro cushion.


I think I may make more felt baskets with flowers. They might come in handy as Christmas pressies for assorted family members.

Best,

I am a basket-case!

Last year, when I started my blog, I briefly had this idea of assigning a particular crafts material to every week and only make projects that involved the chosen material. The idea didn't last very long - I think I managed to do two "MoW"s before it morphed into a "MoM" and then went AWOL. Wow. Or rather not. AnyHOW, looks like I am in a "material of the month" phase again, as during the past month or so I have posted four projects that involved felt - the gingerbread hearts, two cushions, and a flag/banner. And now I am adding another felt project to the list. You've guessed it - I felt deeply about felt...

I actually had a rough day, today, exacerbated by the fact that my Methuselah of a laptop coughed up with a couple of viruses and then decided to forestall my attempts at going online *sighs*. After a brief moment of panic - what will I do if I don't get my daily fix of FB, not to mention being unable to access my cloud-based editorial systems for work - I realised that dear old Methuselah had just given me the greatest gift of all: Time to be creative without the web. And so I gathered my stuff, set up the sewing machine in the warmest room of my house and worked away. Here is the result.


A felt basket.

I had some 2m of grey felt on hand, recently bought as a bargain for about € 6.00. It is about 4mm thick.

To start with I decided how big I wanted my basket and cut 5 square pieces of it, roughly 18x18 cm.


I put two squares on top of each other, carefully aligning the sides, and simply sewed a straight line down close to one edge.


This way I sewed four squares together, ending up by closing the "circle" and sewing square 1 and square 4 together. The hardest bit was actually sewing in the bottom of the basket - fitting 8mm felt under the needle was hard.


Voila - a felt basket in less than an hour for about 50c. For extra stability I turned the rim down.

Although grey is big on trend at the mo, the finished object looked a bit bland. So out came the left-over red felt from the cushions and I quickly whipped up a little flower to adorn the basket.


These baskets are so easy to make. They don't require any fancy patterns - squares is all you need. The felt is easy to work with as it doesn't fray. Only your sewing machine may be a bit overpowered by the thickness of the felt layers. But you could actually hand-stitch the sides together - it would probably give a nice effect, too.

What will I put into my new basket??

Best,


Linking to:  Metamorphosis Monday @ Between Naps On The Porch  ***  Make it for Monday @ Cottage Instincts   ***   The DIY Showoff Project Parade   ***   I Made The World Cuter @ Making The World Cuter  ***   Boardwalk Brag-Fest @ Bobbypins Boardwalk  ***   Spotlight Yourself @ It's So Very Cheri   *** Strut Your Stuff Thursday @ Somewhat Simple   *** Show Off Your Stuff @ Fireflies & Jellybeans  *** Get Your Craft On @ Life as Lori   *** Transformation Thursdays @ Shabby Chic Cottage   ***   Thrifty Thursday @ Tales from Bloggeritaville 

Sunday, October 24, 2010

Halloween Mantle

Hello guys - I was out of the country for a few days and then busy settling back in, so didn't get anything crafty done. But this evening I finally managed to do what I had been meaning to do for quite a while. I was sick and tired of my jugs - and have at the same time updated my kitchen mantlepiece according to season.


Right, Halloween time it is! I dug out my nice ceramic pumpkin and set it up on my kitchen mantlepiece, flanked by those autumnal red apples. And I took down the darling jugs of January (check them in all their glory here ) and replaced them with a wreath heart.

All I did was really put a nice ribbon onto the heart, tie it and add some bells.

My blackboard-painted pebble is making an appearance again, too, this time with a Halloween "boo!"


Now that the days are getting dark again, I have put lots of candles on all mantles, whether it is in the kitchen or the drawing room. I love the warm light they give. And yet, the candle light draws some fittingly eery shadows from the frame. Almost gothic...


Happy pumpkin-carving, everyone!

Best,